
For Vendors:
Your step-by-step reporting guide
Top vendors like you never miss a client deadline. Why should completing your CBUSA purchase report be any different? We’re here to make this process simple and stress free.
No worries if you get stuck along the way or have questions either. Our team is happy to help. We’re only a phone call or email away.
Wondering what and when to report? Here’s your answer:
- All builder invoices must be reported during the correct report period based off invoice date.
- Use the chart below to determine the appropriate dates to report for.
- Invoices must be paid on time, based on your company’s payment terms.
- Note: During the vendor dispute period, we double check to ensure sales align with builders’ reports before invoicing.
Q1 2025
Invoices dated to Report: Jan 1 – Mar. 31, 2025
Reporting Period Open: Apr. 1 – May 8, 2025
Report Due Date: Thursday, May 8, 2025
Builder Discrepancy Period: May 12 – May 16, 2025
Vendor Response Period: May 19 – May 27, 2025
Q2 2025
Invoices dated to Report: Apr. 1 – June 30, 2025
Reporting Period Open: July 1 – Aug. 7, 2025
Report Due Date: Thursday, Aug. 7, 2025
Builder Discrepancy Period: Aug. 11 – Aug. 15, 2025
Vendor Response Period: Aug. 18 – Aug. 26, 2025
Q3 2025
Invoices dated to Report: July 1 – Sept. 30, 2025
Reporting Period Open: Oct. 1 – Nov. 6, 2025
Report Due Date: Thursday, Nov. 6, 2025
Builder Discrepancy Period: Nov. 10 – Nov. 14, 2025
Vendor Response Period: Nov. 17 – Nov. 21, 2025
Q4 2025
Invoices dated to Report: Oct. 1 – Dec. 31, 2025
Reporting Period Open: Jan. 1, 2026 – Feb. 5, 2026
Report Due Date: Thursday, Feb. 5, 2026
Builder Discrepancy Period: Feb. 9 – Feb. 13, 2026
Vendor Response Period: Feb. 16 – Feb. 25, 2026
Five steps to reporting success
Step 1:
Once you have logged in the CBUSA Customer Portal, access the REPORTING module through the top navigation bar on the vendor dashboard.

Step 2:
Upon accessing the REPORTING module, a list of active builders will automatically generate on the left side of the screen.
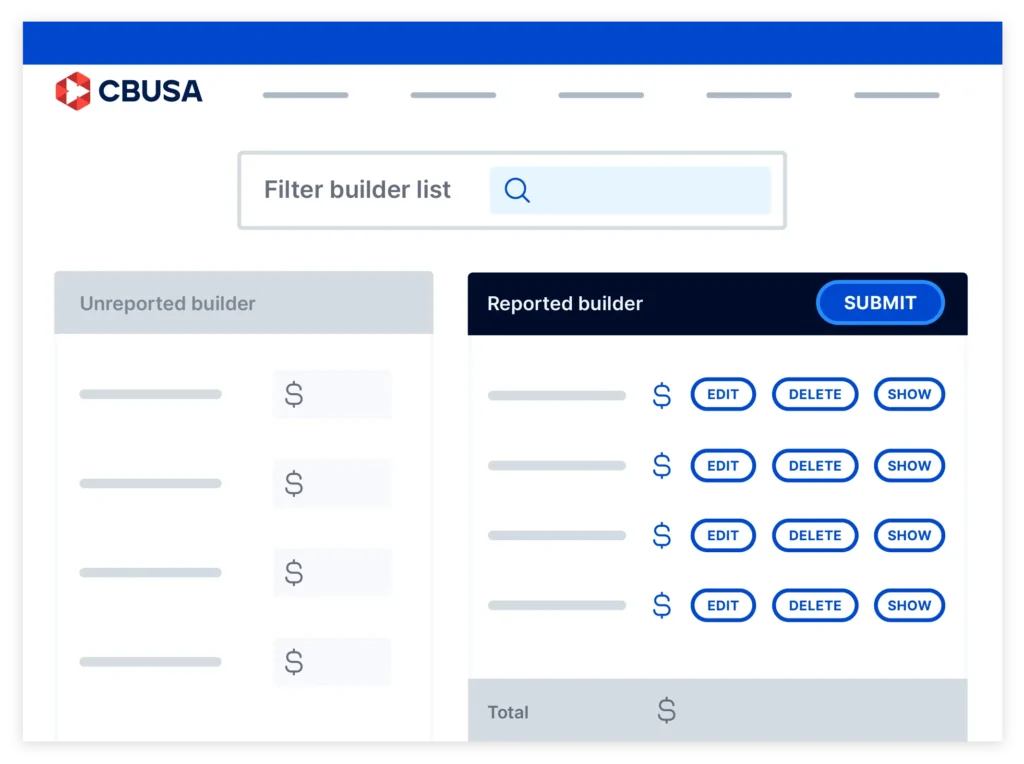
Step 3:
On the left side of the reporting screen, enter qualifying sales in the ‘Total Amount’ column for each builder that your company did business with that quarter. Don’t include sales tax.
- You can choose to select the ‘Save’ button for each builder one at a time or enter the purchases for multiple builders and select the ‘Save All’ button.
- Builders will move from the ‘Unreported Vendors’ list on the left side of the screen to the ‘Reported Builders’ list on the right side of the screen.
Step 4:
Each builder reported for has the following options:
- Edit – Allows you to edit the number you have entered. Once the user edits the number reported, choosing the ‘Save’ button that appears will save the new reported number.
- Delete – Allows you to delete a reported builder. This moves that builder back to the list of unreported builders on the left side of the screen.
- Show Invoices – (This option is not necessary but is available if you’d like to use it.) Selecting this option allows you to enter individual invoices that make up the report for a particular builder that quarter. When you choose this option, you can do the following:
- Select the ‘Show Invoices’ button to enter an amount, invoice number and date associated with the itemized purchase. You can select the ‘Add Invoice’ button as many times as you wish for each builder.
- Hit the ‘Save’ button to save the itemized entry. Once you do, the system will update the total amount reported for that builder by adding all itemized entries together.
- Select the ‘Cancel’ button to cancel the itemized entry.
- Choose the ‘Hide Invoices’ button to hide all itemized invoices entered and display the cumulative total in the ‘Total Amount’ field for that builder instead.Select the ‘Show Invoices’ button to enter an amount, invoice number and date associated with the itemized purchase. You can select the ‘Add Invoice’ button as many times as you wish for each builder.
Hit the ‘Save’ button to save the itemized entry. Once you do, the system will update the total amount reported for that builder by adding all itemized entries together.
Select the ‘Cancel’ button to cancel the itemized entry.
Choose the ‘Hide Invoices’ button to hide all itemized invoices entered and display the cumulative total in the ‘Total Amount’ field for that builder instead.
Step 5:
Submitting your Quarterly Report:
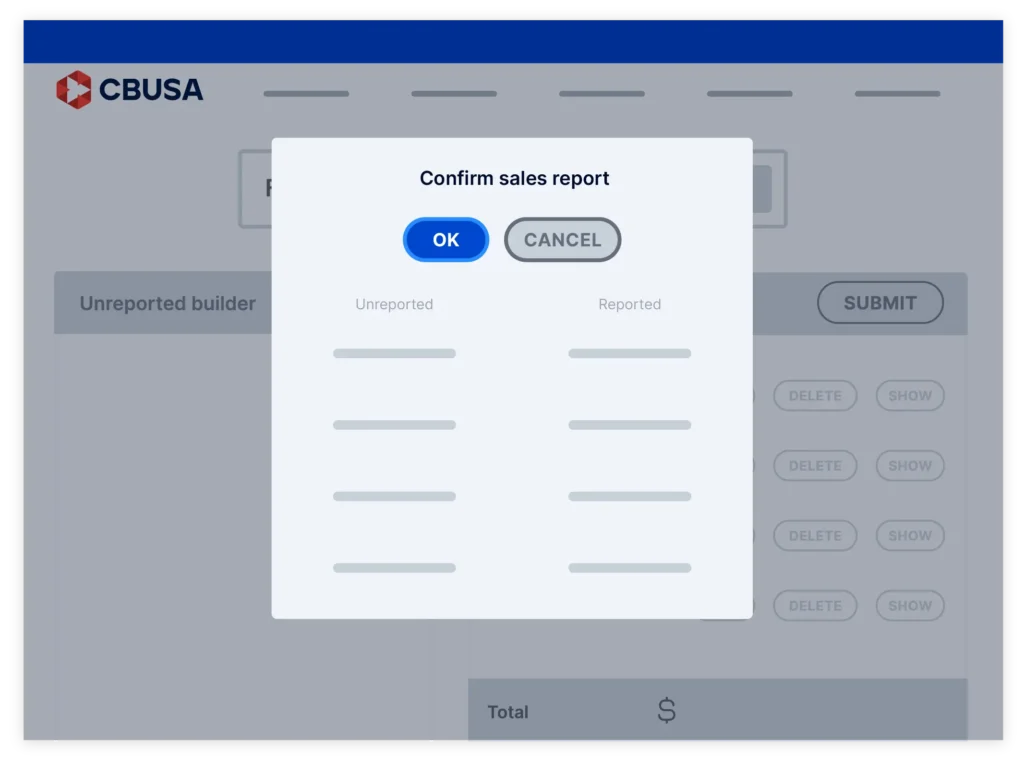
- Selecting the ‘Submit Final Quarter…Sales Report’ button results in a display summarizing the builders that weren’t reported for and those that were reported for, along with the amount. You must scroll down and click the “OK” button at the top of this small pop-up box to confirm and submit your report.
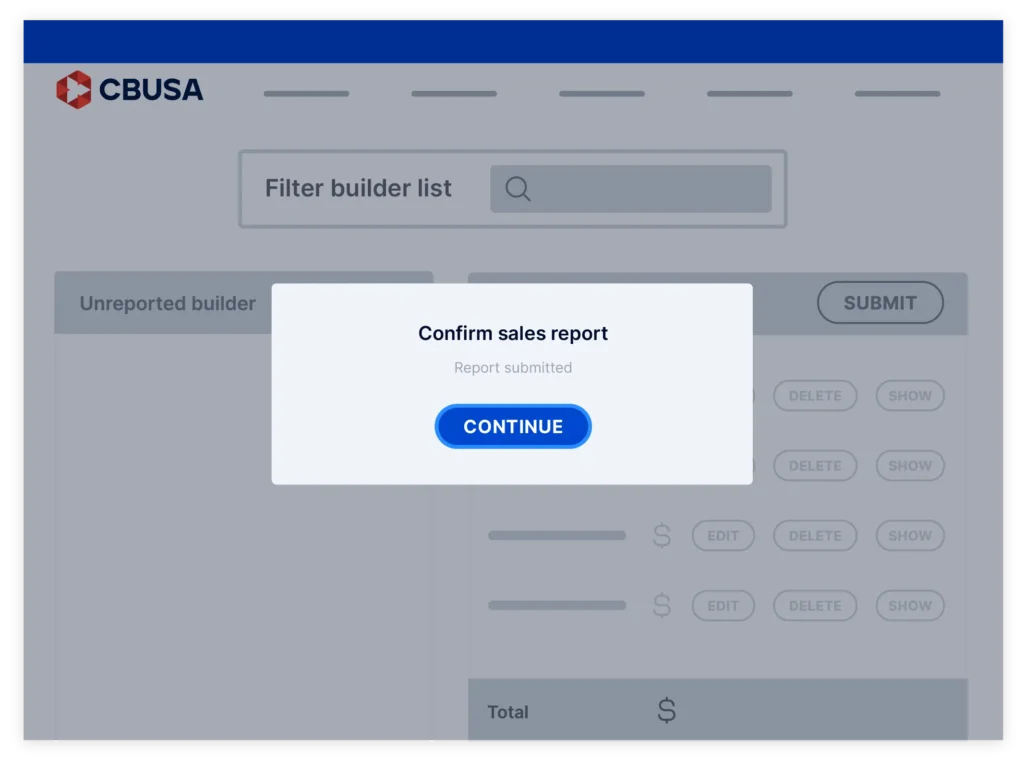
- If you select ‘Cancel,’ you’ll return to the report where you can continue to make changes. When you select ‘OK’ at the top of the summary, a confirmation message is displayed.
- Click on the “Continue” button, and you are done. Once the report is submitted, the “Submit” button becomes an “Edit quarter … sales report.” You may go back and edit or change your report until the report due date.
Questions not answered above?
Our team is here and happy to help. Please give us a call or send an email.